My Couture Notions Shop
The Blog

Welcome in our online shop

€ $ £...

Previous or back to : Back to General Store Back to  Wedding store Back to Traditional or historical costumes store Back to Lingerie store Version française

Sewing, knitting, embroidery, easy and fashion blog

--- ---

16 Item(s)

Set Ascending Direction
per page
Page:
  1. 1
  2. 2

Version française de cet article


Laying a shoulder pad with sleeve head strip is a quite simple operation needing just two seams. Shoulder pads are very important for strengthening shoulders on jackets. They help you rounding the sleeve for a nice fitting. The shoulder pads used for jackets come in a rounded shape, made in felt. They will be located after seam between the fabric and the lining of the jacket.

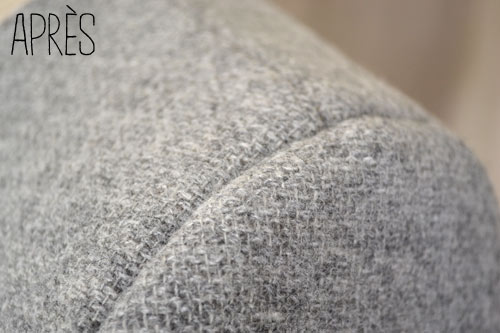
The shoulder pad with sleeve head strip can well support the sleeve head and prevents the sleeve to be hollow in the shoulder pad. See for yourself in this before and after that marks the difference - without shoulder pad + sleeve head strip then with:

Shoulder head: BEFORE without sleeve head strip, AFTER with sleeve head strip

Nadine has concocted small explanations with images and video (at the end of the article) so that fitting the shoulder pad with cigarette becomes a breeze.

20 cm of sleeve head strip

1 / Cut 20 cm of sleeve head strip (for each sleeve). Fold in half the strip and mark the middle with the shoulder line.

Pin the sleeve head strip on the sleeve

2/ Pin the strip on the sleeve side edge to edge with the seam allowance (which should be 1 cm)

Stitching with a straight stitch, on the body side

3/ Stitching with a straight stitch, on the body side of the jacket, the needle exactly in the mounting sleeve seam. If sewing is done poorly, it can deflect the sleeve mounting and create irregularities therein.

Fold in half the shoulder pad

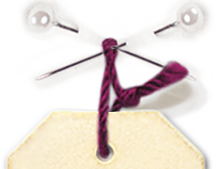
4/ Fold in half the shoulder pad and make it coincide with the shoulder seam body side.

Pin the shoulder pad edge to edge

5/ Pin the shoulder pad edge to edge with the mounting sleeve seam allowance.

Sew the sleeve side still following the mounting sleeve seam

6/ Sew, this time, the sleeve side still following the mounting sleeve seam (for the same reasons as above).

a beautiful shoulder head

And here is the result: a beautiful shoulder head.

And to facilitate fitting the shoulder pad, here is the tutorial video (you can activate the english subtitles by clicking on CC):


Find our felt shoulder pads here and the sleeve head strips here

Bookmark and Share

Blog tags:

Comments | Posted in Tutorials & tips By Amandine

Which pair of scissors for sewing?

Sep 4, 2013 12:00:00 AM

There are mainly scissors for sewing: two kinds of scissors, scissors conventional all-metal type "Nogent" in France or scissors metal blades and ergonomic plastic handles.In these two categories, there is provided a choice of blade lengths that range from 16.5 to 25 cm (see above). The classics are a great value with a more traditional appearance regrindable, those ergonomic handles are adapted to the shape of the hand but are sometimes less accurate cutting of the end (the shape of the tip is coarser than the classic scissors to check when buying.) The cut-son can quickly cut the son at the end of a machine seam. For embroidery, there are small scissors short and thin blades. The pinking shears temporarily help limit fraying or make a decorative finish in tissues that do not fray, but beware these scissors can wear very quickly if they are not of good quality.

Pinking shears

Can we take all kinds of scissors to cut fabric?

fabric to be well cut, demand a certain quality of scissors and precision in cutting. For a beginner who buys first prices scissors, one quickly realizes that all evil scissors cut a little delicate fabrics or thick etc ... We must therefore invest in a good pair of scissors, it is an investment that you never regret, well maintained scissors keep indefinitely

Embroidery scissors

Is there any sewing scissors adapted to left-handed person?

yes, a range of scissors was created specially for left-handed

Métal thread-cut

What size to choose for scissors?

There are different lengths of scissors, those who are very long are reserved for professionals who need long blades to quickly cut long lengths of fabric, but they are heavy and tiring to handle.

Nogent scissors

Which scissors to any activity (embroidery, sewing, knitting)?

For sewing, you need a pair of scissors average length will only cut the fabric with pointed ends (for greater cutting accuracy), a pair of scissors will only cut paper (for employers) and a pair of embroidery scissors for all small delicate and precise cuts (make a buttonhole, pinking etc. ..). When you sew much to the sewing machine, it is also useful to have a wire cutter. For embroidery, embroidery scissors is essential and it is also used for knitting and crochet.

Embroidery scissors

What are indispensable scissors when you start?

A pair of scissors for fabric, scissors and paper scissors embroidery, yes, I know, it's three pairs of scissors to buy!

How can my scissors cut over time?

Still well in time there is a rule of thumb: the fabric scissors cut the fabric and paper scissors cut the paperdo. In fact, the paper is very abrasive blades of scissors, so if you discipline yourself not to follow this rule, "fabric" scissors cut paper will also not intersect anything good! But do not worry, nothing is irreversible, if you have a pair of "classic" scissors you can make sharpening (that is anyway an operation to do make time to time to maintain his scissors.) It was a trade in endangered but thanks to the internet fairy, there are now grinders mail . For scissors plastic handles, there are small individual sharpeners that can refresh yourself its blades. Lately appeared on the Japanese market scissors blades with an exceptional quality of cut, which even allow you to cut both fabric and paper, as professionals we use the paper pattern fusible and this allows us to cut both fabric and boss when the boss was stuck on the fabric.

Bookmark and Share

Blog tags:

0 Comments | Posted in Tutorials & tips By A&A

Free pattern : Zpagetti basket

Apr 9, 2013 12:00:00 AM

Spring is back, it's time to get back to crochet !

We present a free pattern to crochet with Zpagetti yarn from Hoooked available on the website

A quick round basket to achieve using a hook No. 8 or 10 (hook pattern available here) :

Bookmark and Share

Blog tags:

Comments | Posted in Tutorials & tips By A&A

When you sew for yourself, you quickly encounter a problem with the very difficult fittings by yourself, hence the question we might ask, should I buy a dressmaker's form?

Same problem when working for others, between two fittings, it can be interresting to put the garment on a dressmaker's form to check the appearance.

What is the offer to individuals? Said adjustable models with inner joint systems to adapt it to its measurements. They all seem to look the same but with price differences. These can be explained by the mechanism more or less developed, reliable and / or simple in order to update measures.

You can find, in general, wheels that you can turn to move away or closer the dressmaker's form elements, to get the right measurements.

Possible settings are at the bust, waist and hips but you must realize that even though these three measurements are met, this model will never be the true representation of your body, body posture is very different from one person to another. On the other hand, some measurements are not taken into account: cross, distance chest size, shoulder length etc ...

bouton réglage 1

bouton réglage 2 bouton réglage 3 bouton réglage 4

mannequin

In conclusion, we must know how to use a dressmaker's form for what it can do for you: work a collar fitting, a sleeve fitting, take a step back to analyze the general appearance of a garment, to create a form, make a mold etc. ... But do not use it as a true representation of your own morphology, it is better to try the clothing and get help from an experienced person to solve some "good fitting" issues.

Donc avoir un mannequin réglable, c'est bien, voire indispensable si vous pratiquez une couture très créative, mais ne lésinez pas sur sa qualité, les bas de gamme auront toujours des systèmes de mise à mesures moins solides et plus aléatoires. Autre inconvénient, qu'il faut savoir, ces mannequins sont constitués d'une coque dure sous le tissu extérieur ce qui exclu d'y planter des épingles.

So having a adjustable dressmaker's model, is nice, it could be even necessary if you practice a very creative fashion, but do not skimp on quality, low-end systems will always be weaker and more uncertain. Another drawback that you need to know: these models consist of a hard shell under the outer fabric which excluded to plant pins in it.

Quality dressmaker's model example.


Bookmark and Share

Blog tags:

Comments | Posted in Tutorials & tips By A&A

For you beginners or even if you are slightly more skilled, you are buying patterns and occasionally you see barbarians names like fusible interfacing piece etc ..., well, you say what's this thing? is it  done to annoy me when I started? It's already hard enough understanding between the pattern and the handling of the sewing machine!
I'll try to give you some answers .....

The interfacing (fusible or not) is a substance used to enhance a piece of clothing to make the assembly easier or to give it rigidity and held for the proper fit of the garment.
interfacing
Is it necessary?

Yes, to make it look "finished". In each type of clothing, there will be one or more parts to interface: collar and cuffs of a blouse, front, collar, the hight of the sleeves of a jacket, etc ....

There are several kinds, what do I choose?

This is where it gets difficult for several reasons:
-> It is necessary to know the material of the fabric you want interface because it determines the choice,
-> You have to know interfacings to know which one to choose.
-> You need to find the right place where you can find a selection of interfacings for sale with someone who can guide you in your choice
in other words the squared circle!

To help you, there are two major types of interfacing: the "to be sewn" and the "fusible".

The "to be sewn" interfacings are traditional, still used by tailors or when we have a fabric that does not support fusible temperature.
There are several thickness, your choice will be an interfacing of the same thickness or slightly less than the fabric you need to improve.

Assembly is done by cutting the covering to the same part to interface and building the two layers together. assembly is done as if it was only a single layer.

The traditional assembly is more sophisticated  and is called "frosting" see free documents "method for mounting the suit canvas."

Fusible interfacings are faster to put in place but more delicate implementation because the sticking must be perfect to be invisible. This implies that we used the correct method of collage and especially that the fusible interfacing is of good quality.

How to recognize a good quality interfacing?

Visually, there is a very simple way, the adhesive must be placed by dots, drop out cotton cloth with a layer of smooth and glossy glue, the collage will not be sustainable not efficient or will show blisters.

Anyway, it is imperative to make a sticking test on your fabric before you start. Because a failure on front clothing, all blistered or too stiff, can be really ugly!

To be stitched or fusible interfacing in our shop.

Bookmark and Share

Blog tags:

Comments | Posted in Tutorials & tips By A&A

The phenomenon Zpagetti!

Oct 25, 2012 12:00:00 AM

Two new simultaneously:

Firstly, we welcome a new thread in the famous shop ... Zpagetti! This is an amazing thread, it comes from recycled fabric and jersey can crochet / knit with needles 10 to 15 mm ! We thus obtain a work that can quickly go the basket, passing through the carpet bag and pillow.

It is now available in 14 color choices! :

fil zpagetti

The second: The workshop Aléfil in Paris (which holds the knitting store site) is on France 2 this morning!
Report  "Les nouvelles laines sont arrivées !" (the new wool yarn arrived!) by Aurélia Bloch under the France 2 program "c'est au programme" (it's sheduled) on 25/10/2012 by Sophie Davant.

Revisit the France 2 program.


A very simple bag project has been notably presented. Find explanations here (french):

sac zpagetti

Bookmark and Share

Blog tags:

Comments | Posted in News Tutorials & tips By A&A
--- ---

16 Item(s)

Set Ascending Direction
per page
Page:
  1. 1
  2. 2