My Couture Notions Shop
The Blog

Welcome in our online shop

€ $ £...

Previous or back to : Back to General Store Back to  Wedding store Back to Traditional or historical costumes store Back to Lingerie store Version française

Sewing, knitting, embroidery, easy and fashion blog

--- ---

16 Item(s)

Set Ascending Direction
per page
Page:
  1. 1
  2. 2

How to knit socks?

Nov 30, 2016 12:00:00 AM

You dream of a nice warm pair of socks for this winter and you know how to knit? Two positive points to finally get you started.
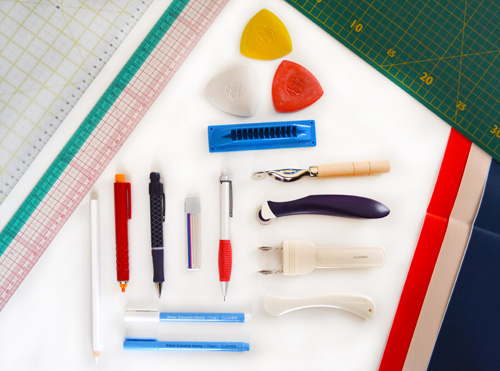
The equipment

- 1 set of 5 KnitPro double-tipped needles or 3 mm circular needles

- 1 wool ball Balade from Cheval Blanc

- 1 simple socks model

The method

Knitting socks can be a little scary seen from afar, to start we knit in circles!

But don't worry, knitting in circles is not difficult, here is a video that could help you.

Traditionally, socks are started with the upper and lowered to the toes. Other models are presented in the other direction which can be not bad to try your sock at the same time as you knit.

Stem and foot are not difficult to knit. For the heel, there are many methods depending on the desired rendering. You ask me the best heel method, here is one (in English on ravelry).

The tip is the rewarding period of the sock: the final cuts! It asks to realize decreases according to the model, nothing complicated.


Knitting needles

The double-tipped needles are not very easy to handle at first, but after a first handling, it goes pretty fast.

With KnitPro circular needles , you will use the magic loop method. It is a simple method which, for my part, takes a little longer.

I advise you to take needles n°3. Tiny you tell me? But it is the ideal number for the socks, thicker than in the trade and thus quite warm but thin enough all the same to continue to enter in your shoes!


The wool

Which wool will you choose? This choice is not insignificant. If you're going to knit socks, they might as well keep your feet warm and last a long time, right?

The ideal wool should contain a majority of wool and a little polyamide. Polyamide will allow the sock to resist friction. We suggest you our favourite wool:

- The Balade from Cheval Blanc balls.

Among this wool, you will have the choice between many colors but also the ecological range! A yarn made from 100% recycled fibres: 70% wool, 20% polyamide and a mixture of 5% other fibres.

If you want to make original, lean for the two-tone , you'll never get tired of it.

This wool is knitted with needles n°3, still our ideal number to knit your first pair of socks.

All you need is only one ball to make your pair of socks.
.

The pattern

Now let's go, you'll see, knitting socks is a wonderful experience! But which model to choose?

Crucial choice because knitting socks can be a bit long, especially that you have to knit 2. You therefore need a model that will not tire you so that you remain motivated for the 2nd sock.

Even if a simple jersey model can attract you at first sight, I advise you rather to start with a relief stitch or with an easy cable stitch.

If you have a Ravelry account (the knitting facebook), otherwise I advise you to open one, it's easy and free (be careful the website is in English). Some easy patterns are available in French:

- Hermione's everyday socks

- Shtroumpfette's socks

- Pretty harbour (english)

Personally, I also really like these and their little cross motifs.


Have you decided? Then go for it. Warm socks for Christmas is a good gift idea, right? Do not hesitate to share your creations in wool socks Stroll on our Facebook page or Instagram #aetapatrons.


Bookmark and Share

Blog tags:

Comments | Posted in Tutorials & tips By Amandine

It's getting cold, so we think winter, coats, knitwear?!

What would you like to sew for this winter 2016/17? To help you in your investigations, we introduce you our selection with beautiful novelties !

Buttons for coats

Our coat fabrics:
wool and boiled wool

Knitting kits

The velvet milleraies


Image term translation:

boutons en corne pour manteaux : horn buttons for coats
kit tricot: knitting kit

laine bouillie de luxe: luxury boiled wool

lainage pour manteaux: woollen for coats

Our wonderful luxury red, black and blue boiled wools will be perfect to sew you a coat this winter. These boiled wools are 100% wool of very beautiful quality. Metal, wood, horn or marble buttons are ideal for winter coats and jackets.

Don't forget our brandebourgs , these straps can be sewn on a pea jacket, cape or coat and can give a very chic effect. We have brandebourgs to sew in leather or imitation leather.

If you want to start knitting for this winter, we propose you

some Knitting kits for beginners !:

Very nice accessories like the Pavel hat kit with its mohair wool, the Sorlin snood kit in XXL wool and the minute mitts in recycled French wool. Stay informed about the release of the new knitting kits during winter around here.


the sewing skirt, poncho, jacket and sweater patterns made by A&A can be good sewing project ideas for this winter.

And you, what would make you dream of sewing for this winter?

Bookmark and Share

Blog tags:

Comments | Posted in Tutorials & tips By Amandine

Sewing your underwear or swimsuit

Jul 13, 2016 12:00:00 AM

Many of us look for the perfect swimsuit for this summer... And if we would go into sewing a unique and original one?

We noticed the success of our swimsuit clasps and hooks, adjustment buckles and bra rings.

All this little equipment needed to swimsuit and bra sewing seems difficult to find in France. So, we are headed to look for providers to expand our range and to summarize for you the useful material.


Basic equipment for sewing lingerie (any type):

- Stretch thread

- Jersey needles

Swimsuit

For a swimming suit, you will have to find the mat, or shiny, or patterned super stretch Lycra fabric. From our side, we have not yet found the perfect quality to offer you ...

For hems, we add an invisible and sea water resistant, very flat elastic, I appointed the framilon !

To fasten your swimsuit, we released a multitude of metal or plastic back clasps .

You could also sew  swimsuit pads to bring more structure, we have some flesh colored or white.

Underwear

To sew your underwear (bra and panties, tanga, boxer...) you need some very soft jersey fabric containing a small amount of elasthan. We advise you to take organic cotton knitted fabric which will be very soft to wear.

For straps, you will have to sew yourself from the same fabric and elastic, or buy ready-made. We can provide by the meter transparent elastic straps, double sided, white and pastel colors:


Good news, to adjust your straps and attach them properly to the bra, we offer a wide choice of colors and materials:

- the adjustment buckles

- the straps hooks

- the straps rings

If you want to sew a bra with underwiring, we also have the sizes choice of  straps rings and also of  armature protectors .

To fasten your bra on the back you can choose between:

- the by the meter  hooks strip flesh coloured, white or black,

- the white hooks sold by two with elastic

You can also find our  bra extenders over there.

Well now you have the basis for your underwear, but if we talk about ornament, you can add a wide, thin elastic lace or then border with a mat tape, satin or chiffon as bias (but very elastic).

- the wide  lycra elastic laces : blue, pink or green sequned, gray or white.

- the  thin elastic laces , with picots or scalloped.

- the  matt, satin or chiffon pre folded strips .

Also find over there our white or ecru linen bows.


Little more to keep your underwear or swimsuit strapless (also useful for strapless dresses) the by the meter silicone tape !

Bookmark and Share

Blog tags:

Comments | Posted in Tutorials & tips By Amandine

Learning to knit: the basis

Feb 3, 2016 12:00:00 AM

Winter begins to be felt timidly in this early 2016 ... the perfect time to get back to knitting!

Since I give knitting lessons (it's been 6 years!), I had a lot of people completely beginners, ie which start from zero. This allows me to make you a basic tips small summary if you feel the urge to begin knitting.

wool knitting learning

1/ The basis

What do you need to start knitting?

- A pair of knitting needles

- A ball

- A very easy pattern


Knitting learning diagram

2/ The pattern choice for beginners

Very important ! It's the first thing you need to find. It is important to start knitting small as this can be very frustrating to quickly begin a long scarf and realize in the middle we lost the motivation to finish it.

I suggest you start with adult accessories or ultra-easy baby clothing. The easiest beginners stitch is the garter stitch. You can also test the jersey stitch but for the ribs, you'll see it later!

knitting jersey and garter stitches

The snood (or neckband) and mittens are ideal to start. See eg  Sorlin Snood with needles 15 and Triad mittens with needles 6. It's straight on and all in garter stitch. No reduction or increase but a quick super nice finish!


Beginners Snood and Mittens knitting kits

For a baby clothing, I recommend the Paul vest, slightly more complicated than the accessories (you will have to increase by several stitches) and needles are a little finer but clear explanations will guide you easily to the final sewing and you will be proud to offer this little jacket to a baby. It is also available in kit.

Paul vest an easy baby knitting kit

3/ Select the ball

Choose what is commonly called  the "wool" is not so obvious. You will find balls in many haberdasheries with very pretty colors but unfortunately not containing 1 gram of wool!

- The material:

I made the choice to offer you on the website, only knitting threads with a majority of natural material.

The material may be: from the sheep wool  (mostly merinos, very soft), recycled yarn from different materials, alpaca (slightly hairy and warmer), mohair (cloudier), cotton (lighter for summer) or even cashmere and silk.

For beginners I suggest you buy a ball of 100% wool, 100% recycled or 100% cotton (if it is for the summer or for a baby). Other wools are more expensive and sometimes it is less clear to observe our meshes or unravel without nodes (alpaca and mohair particular).

Our special beginners knitting balls:

beginners knitting wool

- The thread size:

It is very important to well choose the thread thickness to begin knitting! It is even essential.

The wool ideal thickness that I recommend to begin knitting is for needles 5 mm up to 15 mm.

The needle number is always shown on the ball label (see below):

wool ball label

4/ Choose the pair of knitting needles

The pair of knitting needles number depends on the yarn you've chosen (and if you were paying attention, so printed on the ball label). The knitting needles numbers match their diameter in millimeters. They range from 2 mm to 25 mm or even 30!

There are also  différent needles shapes: straight, circular, double-pointed ...

The circular and double-pointed needles have been developed for seamless circular knitting: hats, gloves, mittens, socks, etc. But interchangeable circular knitting needles new lines (Knitpro line for example) can be very practical to knit straight works (in two-way) and circular, no need to buy both straight needles and circular needles! They need a small starting supplementary budget but they be used all your life.

For beginners, if you do not yet know if you and knitting that's for life, I suggest you opt for straight knitting needles 25 to 35 cm long. 25 cm is a minimum and for small works for babies and children.

You will also have the choice in the knitting needles material! Increasingly type of needles exist and that's good.

There are metal needles, used since time immemorial, they have the advantage not to break but can be heavy (in addition to knit), too slippery to begin, noisy and cause allergies.

You can choose also in wooden needles: bamboo or birch.

knitting needles wood, bamboo or birch

Wooden needles are much lighter than metal and do not let slip the stitches. Bamboo remains fragile for small sizes needles (2 to 3.5mm) but the birch is one of the toughest! See our range of 100% birch Basix Birch Knitpro needles. In addition, the wooden needles are very pretty!

It remains plastic needles that I prefer not to propose, they cling too much wool, stitches do not slide well and the feel always appeared to me unpleasant. By cons they do not break and are also very slight.

Bookmark and Share

Blog tags:

Comments | Posted in Tutorials & tips By Amandine

You start sewing or you sew already for a while and now, you can find the patterns with or without seam allowances. When you are a novice, you get lost and you do not understand the "why and how" and when we used to sew, we are adept of "with seam allowances" or "without seam allowances."


Pattern and seam allowances


As a professional, I will try to explain the advantages and disadvantages of each method.

Patterns without seam allowances (or seam allowances not included)

First, working without seam allowances allows you to check all assembly lengths coherence: for example, does the collar fit the neckline where it will be mounted? What is the value of the ease (*) of a sleeve? etc ...

Within our design office all patterns are developed initially without seam allowances, we also digitalize without seam allowances and then we check with one of the tools of our software all coherence lengths (see above, but also the side seams etc ..).

So if you buy a pattern without seam allowances, you will have to add them on the fabric and make a mark

Advantages: assembly accuracy for fine finishes and facilitates all delicate assemblies, easy to modify because you know where is the original outline of the pattern. For a model which you are not sure, you can take the precaution to add larger seam allowances for a fitting.

Cons: this method is long because you have to add the seam allowances accurately and you have to do the pattern outline marking, so you need good marking tools, accurate and lasting the time of your assembly.

Going back to our design office, when we have checked all our pattern, we add the seam allowances because they are patterns for industry and all of the adjusment fittings were made, then we adapt the seam allowances to the assembly type and to the manufacturer's(**) hardware. 0.5 or 0.7 or 1 cm etc ... following sewing types.


Transfer seam line with roulette


Patterns with seam allowances (or seam allowances included)

So if you buy a pattern seam allowances included, you don't have any additional work to do on the fabric, you can set up, pin and straight cut along the pattern edge, you just need to know the value of the reserve.

Advantages: much faster to cut and assemble, no sewing lines to match.

Cons: if the assembly is very technical, you don't have the pattern outline mark to guide you, it requires great sewing techniques mastery. The seam allowances have been set, you do not have much room to maneuver in case of fitting.


Our conclusion: prefer patterns seam allowances included for all simple clothing that you don't want spend too much time.

But if you get into the "beautiful" for which you want the hang perfect which implies some fittings, if you are precise and meticulous take a pattern without seam allowances.


Lexicon:

*ease: the sleeve head is always slightly larger than the armhole, on which it is mounted, this difference in length is placed, assembling, at the top of the sleeve over a small distance from both sides of the shoulder line. These are not gathers, it's a mounting ease, ie we play on the ability of the fabric to absorb a small difference in length when sewing. This ease allows to garnish the round part of the shoulder without the sleeve pulls.ease: the sleeve head is always slightly larger than the armhole, on which it is mounted, this difference in length is placed, assembling, at the top of the sleeve over a small distance from both sides of the shoulder line. These are not gathers, it's a mounting ease, ie we play on the ability of the fabric to absorb a small difference in length when sewing. This ease allows to garnish the round part of the shoulder without the sleeve pulls.

**manufacturer: outsourcing company dealing only with sewing clothing collections

Bookmark and Share

Blog tags:

Comments | Posted in Tutorials & tips By Nadine

How to choose the sewing thread?

Mar 25, 2015 12:00:00 AM

The sewing thread is a major element to consider when you start sewing. With the pattern, the fabric and the sewing machine of course.

sewing machine thread

In order to choose its sewing thread, must be taken into account:

- Color: the sewing thread color must matched the fabric. The dominant color of our fabric is chosen. Whatever our fabric is floral, striped or geometric patterns. In general, it is better to rely on a darker color than our fabric.
As it is difficult to choose a color on internet, we offer that you send us a sample of your fabric in order we adapt the color of thread for you for free.

- Material: the most common material in sewing thread is polyester. Cotton is also available but it is quite expensive. Polyester sewing thread offer a wider choice of colors for an economical price.

- Quality: be careful, it is important not to skimp on sewing thread quality! There are a multitude of very cheap sewing machine threads but of poor quality which, over time, will damage your sewing machine. So beware to supermarket sewing threads or online kits.

Unfortunately, we know very well the problem through our sewing machine repair service...
We advise you to choose a slightly more expensive sewing thread but high quality. The d'A&A sewig thread is manufactured in France and has never caused any trouble to our machines...

It is possible to test the thread quality with its strength, the sewing thread that we offer resists to a 1.1kg weight.

sewing machine thread

The various kinds of sewing threads;

- The classic sewing thread: for making clothes and all type of decorations. This is the universal thread for family sewing machines. We offer 240 colors.

You can choose different packages : in small reel 200m, average reel 1000m or cone 5000m which is particularly suitable for the serger but can also be used in sewing machine with an adapter: the cone holder.

- The elastic sewing thread: thread particularly used to make smocking or gathers. Knitting, it is also used to tighten ribs of a sock.

- Overlock thread:thread with bouffant appearance. This thread is particularly used with the serger or coverstitch machine for the knitted fabric sewing. Therefore it is proposed by 2000m or 10000m cone. Overlock thread is used frequently for lingerie, swimwear and sportswear.


If you are new to sewing, you'll need quickly to have a mix of the main colors and especially white, black and raw. If you sew regularly, it is recommended to take 1000m reels more economical.

Bookmark and Share

Blog tags:

Comments | Posted in Tutorials & tips By Amandine

How to make a basket in trapilho?

Mar 2, 2015 12:00:00 AM

After the success of the trapilho crochet basket, free pattern to download here, we thought it was necessary to start with you.

Because we regularly offer the trapilho basket workshop at Henry & Henriette in Nantes, we also noticed that the beginning was hard to achieve and retain, once the we had completed his first basket.

To fill this gap, so we made a video to start the basket, that is its bottom. The part to create the edges being much simpler following the explanations.

Find our great trapilho balls here and small there. The trapilho crochet basket kit is available here.The Knit Pro Waves hooks (which can be seen on the video 8mm) are here.

Please tell us what you think about this video and suggest us some others!

Bookmark and Share

Blog tags:

Comments | Posted in Tutorials & tips By Amandine

The different tools to trace in sewing

Nov 19, 2014 12:00:00 AM

Our A&A's designing works allows us to test all fabric tracing patterns methods.

But what are the tools used and what are they for? We will attempt to answer these questions in detail.

In sewing, drawing on fabric is a must for
1/ Report outline of your pattern and mark the seam lines
2/ Draw seam allowances which also correspond to the cut lines of your fabric
3/ Transpose the seam lines on the other fabric layers

Pencil, marker and chalk to draw on the fabric
What are the tools to draw on fabric?The fabric tracing is very important to mark the values seams and your pattern outline on your fabric and the sleeve marks, etc... There are many tools which can have a different use depending on the medium and the desired accuracy.


- The chalk: The most widespread drawing tool, the tailor chalk, available in several colors allows to produce moderately coarse lines on different colors fabrics at lower cost, available on a-et-a.com in 3 colors set: white, red and yellow. The chalk must be trimmed regularly to stay quite fine and accurate, it requires so a chalk sharpener (here blue).
- The chalk roulette: is generally used for wool but requests that the seam is carried out in the aftermath because the powder disappears quickly. Its layout is thinner than traditional chalk.
- The pencil: more accurate than chalk, pencil needs to be purchased in several colors to match different fabric colors. It too must be trimmed regularly with a pencil sharpener to gain accuracy.
- The mechanical pencil: may exist with more or less thick leads, the more accurate is the 0.9 mm mechanical pencil allowing, unlike chalk or pencil, a thin and precise line. It is ideal for drawing, there are some with thick chalk (here in red), white (here in purple, from Prym)or with pink, white and blue chalk refill (here in red and metal). The eraser can erase the lines directly, if not, as for chalk and pencil, the line goes in the wash.
- The fineliner: the fabric fineliner can have different thicknesses, those presented come from Clover, they have the advantage of a clear blue light marking but well visible which readily disappears with water.
- Lines marker : allows you to draw with a fabric that clearly marks the fold as wild silk. Is used for instance when you can not make pencil line because the fabric is clear or transparent (see our Clover model here).

roulettes pour tracage tissu

Once the drawing done, it is important to copy the seam lines on the other fabric layers. You then use the famous roulette, carbon paper and a cutting board to avoid damaging your table.

Transposing seam lines with roulette

To transpose your sewing lines, you only need a cutting board, some carbon paper contrasting over your fabric and place over your fabric cut pieces to be transposed. You then draw your pattern layout with the roulette which will transpose the corresponding dots on the other fabric sheet through carbon paper.

We have several tools choices for this:

- Classic roulette : Vintage wooden fabric roulette. Handy roulette with a nice beech handle.
- The ergonomic roulette: Very nice because this roulette fits snugly to the hand. This is the roulette that we normally use in our design department.
- The double roulette: it is used with another method which consists in tracing first time the pattern outline along the seam allowance and then trace by hand, on the other side, the pattern outline.
- The carbon paper: essential to copy your pattern outline, the carbon paper is available in several large sheets of different colors (here 3 sheets 54 x 42 cm in red, white and blue). This copying paper allow to copy many outlines and can be used very long.
- The cutting board: thick media to protect your table, the cutting board allows all types of work: copying lines with roulette, cutting with rotary cutter, etc... Available in 2 sizes in a-et-a.com here.

Japanese rule and sewing patchwork

- The 50 cm sewing Japanese rule: essential element for all designers who respect themselves;). This 50 cm Japanese rule can easily transpose seam allowances on your fabric thanks to its in cm horizontal and vertical scales. Our Clover rule has even a 1.5 cm green contrast part corresponding to the seam allowance commonly used. Japanese rule is also essential for all pattern designings.
- The rectangular rule: very convenient for drawing parallel lines on the fabric because it maintains the fabric due to its large area, it also prevents the fabric from moving when drawing. It can also be very useful for rectangles paths and throught the fabric bias, it is ideal for patchwork work.

And you, what tracing tools do you use in sewing?

Bookmark and Share

Blog tags:

Comments | Posted in Tutorials & tips By Amandine

Making suspenders

Oct 8, 2014 12:00:00 AM

Suspenders are both practical and decorative. We had idea to do a little tutorial to show you the manufacture of suspenders in our way: simple and fast.

suspenders DIY

The material:

- 2 rectangles of stars fabric
7x75 cm for 2 to 4 years child,
7x85 cm for 6 to 8 years,
7x90 cm for 10 to 14 years,
9x110 cm for 16 years to adult.
- sewing thread matching the fabric
- 4 25 mm suspenders clasps for child, 36 mm for adult.
- 2 adjustment clips 25mm (child) or 36mm (adult)
- 1 suspenders cross-brace 25mm (child) or 36mm (adult)
- 2 black or white elastic band 2cm wide x 15cm

Tools:

- loop turner (indispensable)
- cisors
- sewing machine, of course!

We made a video just for you to show each step in picture (you can activate the English subtitles by clicking on CC):


To help you achieving, we added the tutorial, with step by step photos:

1 / Iron each cut strip of fabric

Iron the fabric strip before making suspenders

2 / Fold each strip of fabric right side against right and stitch to 1cm from the edge then Iron the strips seam very flat before returning it.

Iron the seam flat

3 / Once the strips returned with the loop turner iron it the seam centered.

Once the suspender returned, iron it

4 / Slip in each of the suspenders on the future front part the adjustment buckles, fold the fabric twice and stitch.

Slip the adjustment buckles

5 / Now slip in each of the suspenders, the suspender clips, then move the strip in hand in the adjustment buckle by ensuring the buckle and the clamp are on the same side. Tighten the adjustment buckle on the strip.

Put the suspender clamps

6 / Slip each strip crossing them in the cross-brace.

Slip strips in the cross-brace

7 / Push each of the elastic bands in the back part of each strip with the loop turner (pass through the seam) up to 30 cm in height, secure it with a pin and stitch.

Push elastic bands in each strip

Elastic band in suspender strip

Elastic band suspender sewing

8 / Place in each of suspenders, the back clamps, fold the fabric twice and stitch.

Suspenders adjustment clamps sewing


Well done! It's over, you just have to give your custom suspenders or pair them with the kids outfits. Why not strapless floral fabrics to give a chic and cheerful side to a man's outfit?

Find all our printed patterned fabrics on this page to give you some suspenders creation ideas!

DIY: adjustable stars suspenders finished

Bookmark and Share

Blog tags:

Comments | Posted in Tutorials & tips By Amandine

Lace headband

Aug 5, 2014 12:00:00 AM

For this tutorial, we thought of wedding hairstyles or parties This lace headband is very simple to make and adds a nice customization to a simple hairstyle. The tutorial can be adapted to the manufacture of any lace or ribbon headband, it just requires that the metal fastener width is adapted to the ribbon width!

At first, you need:

- about 45 cm of 35 mm cotton lace

- 2 antique silver metal clips, 3 cm width

- about 18 cm of black or white elastic, 3 mm width, 4 gums (according to the color of your light or dark hair)

- some sewing thread matching the lace (raw or white) and a needle

lace headband tutorial

1 / Prepare your sewing needle with the thread and lace.

lace head jewel diy

2 / Fold the tip of the lace once and then a second time to form a small hem and sew the hem with your needle.

wedding lace headband tutorial

3 / Sew stitching still in the second row of holes, with back stitches.

lace headband tutorial

lace headband tutorial

4 / Repeat with the second side.

lace head jewel diy

5 / Then insert the black or white elastic in the remaining two large loops.

lace head jewel diy

6 / Sew by hand or machine (with a zigzag stitching) the elastic previously 1 cm superimposed.

lace head jewel diy

7 / Cut the threads and try!

raw lace headband

We have a large selection of laces, ribbons, or even trimmings that can adapt to this tutorial, leave room to your imagination.

Bookmark and Share

Blog tags:

Comments | Posted in Tutorials & tips By Amandine
--- ---

16 Item(s)

Set Ascending Direction
per page
Page:
  1. 1
  2. 2